映像クリエイター・カメラマン
長谷川 敬介 (はせがわ けいすけ)
KSクリエイト / 合同会社ケーエス代表。
映像制作・写真撮影の実務経験をもとに、写真と動画の撮影・編集に特化したメディアを運営しています。現場で使えるテクニックやツールの使い方を、個人クリエイターや中小企業の広報担当者向けに発信しています。長年の実務経験をもとに、「すぐに使える」ノウハウを分かりやすく解説しています。
要約
- ドロップシャドウの「できない・見えない」原因は、設定を見直すことでほとんど解決できます。
- 不透明度・角度・距離などの調整で、自然で見やすい影を作ることができます。
- Photoshop ドロップシャドウの基本と応用を知れば、デザイン表現の幅が一気に広がります。
はじめに
「Photoshopで影をつけたはずなのに、なぜか表示されない…」そんな経験はありませんか?
ドロップシャドウは、文字や画像に立体感を加える便利な効果ですが、設定を少し間違えると「影が見えない」「雰囲気が合わない」といったトラブルが起きがちです。
この記事では、ドロップシャドウの基本的な使い方から、よくある原因と対処法、さらに応用テクニックまでをわかりやすく解説します。
Photoshopでのデザインに影を自然に取り入れたい方は、ぜひ最後までご覧ください。
\ 7日間無料体験 /
※いつでも解約ができます
Photoshopのドロップシャドウとは?
Photoshop(フォトショップ)のドロップシャドウとは、文字や画像などに「影」をつけて立体感を出すための機能です。デザインにメリハリを加えたり、要素を目立たせたいときに役立ちます。
ドロップシャドウの基本的な効果と用途
ドロップシャドウは、その名前の通り対象となるオブジェクトの後ろに影を落とす効果です。
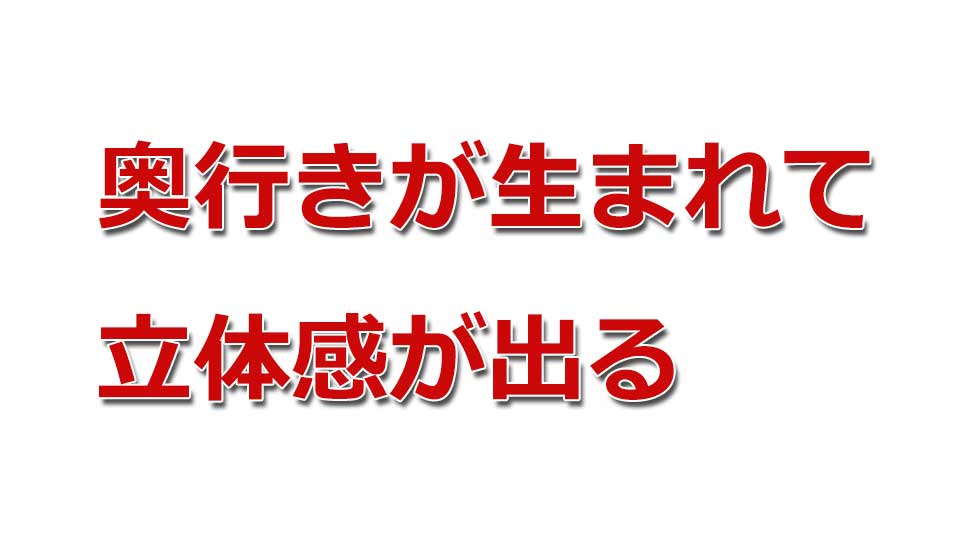
影をつけることで以下のような効果が得られます。
- 奥行きが生まれて立体感が出る
- 背景と文字や画像がはっきり分かれて見やすくなる
- デザインに自然な雰囲気を加えられる
Photoshopでは、影の「距離」「角度」「ぼかし(サイズ)」などを細かく調整できるため、リアルで自然な影を作成することができます。特にWebサイトのバナー制作やグラフィックデザインでよく使われます。
主な使い道:文字・画像・図形への影効果
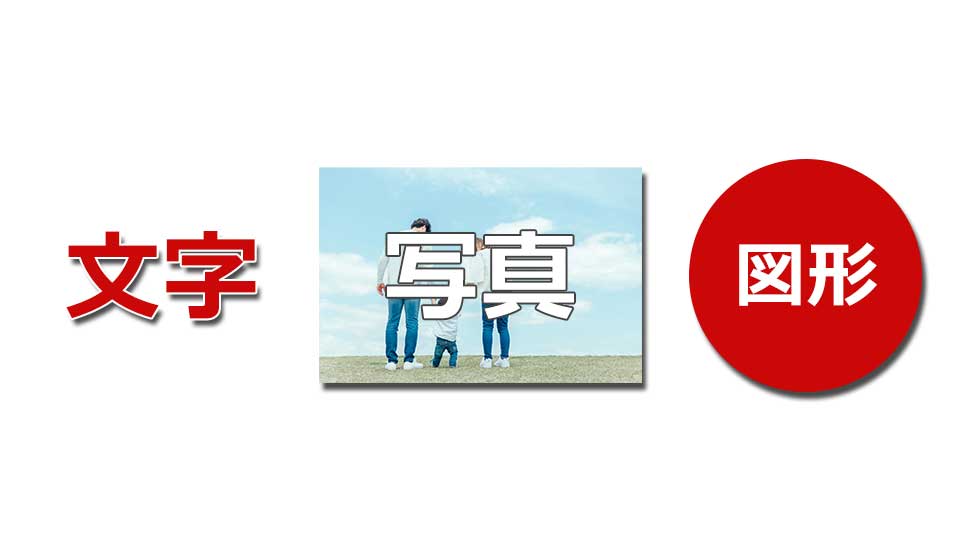
ドロップシャドウがよく使われる対象は、次の3つです。
- 文字:背景から浮き上がらせて視認性アップ
- 画像:立体的に見せたり、ページ全体に奥行きを出す
- 図形:デザインにアクセントを加え、バランスを取る
たとえば、暗い背景に白い文字を乗せるとき、影をつけることで文字がくっきり見えるようになります。また、商品画像などに影を加えると、より引き立って見える効果もあります。
Photoshop以外(CSSなど)との比較
Web制作では、PhotoshopではなくCSS(スタイルシート)を使って影をつけることもあります。主な違いは以下の通りです:
| 項目 | Photoshop | CSS |
|---|---|---|
| 調整の自由度 | 非常に細かく設定可能 | シンプルで限られたパラメータのみ |
| 表現力 | グラデーションや複数影など表現が豊か | 基本的な影表現に限られる |
| 軽さ・速さ | 画像として出力されるためやや重め | コードで処理されるためページ表示が速い |
| 使用シーン | デザイン・画像編集向け | Webページ・UIの実装向け |
 けいすけ
けいすけプロジェクトの内容に応じて、使い分けが大切です。
制作で活きるドロップシャドウのコツ
ドロップシャドウを効果的に使うためには、影の設定を丁寧に調整することが大切です。以下のポイントを押さえると仕上がりが一段と良くなります。
- 不透明度:影の濃さを調整して、背景になじませる
- 距離と角度:光がどこから当たっているかをイメージして設定
- サイズ(ぼかし):自然な柔らかさを出すにはやや広めにするのがコツ
これらを微調整することで、プロっぽく統一感のあるデザインが仕上がります。特に「設定のしすぎ」「影が強すぎ」は逆効果なので、自然な仕上がりを意識することがポイントです。
Photoshopでドロップシャドウを設定する手順
Photoshopでは、ドロップシャドウを簡単に追加できます。基本的な設定から細かい調整までできるので、デザインに合わせた自然で立体的な影を作成できます。
レイヤー効果からドロップシャドウを適用する方法
まずは、影をつけたいレイヤーを選びましょう。
そのあと、以下の手順で設定画面を開きます。
- レイヤーパネルで対象レイヤーを選択
- メニューから「レイヤー」→「レイヤースタイル」→「ドロップシャドウ」をクリック
- 設定ウィンドウが表示される
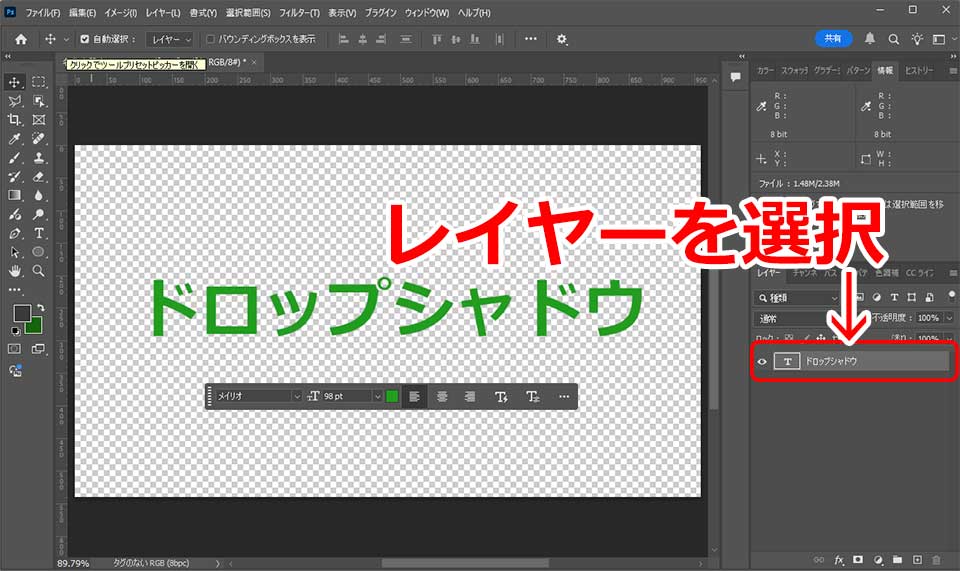
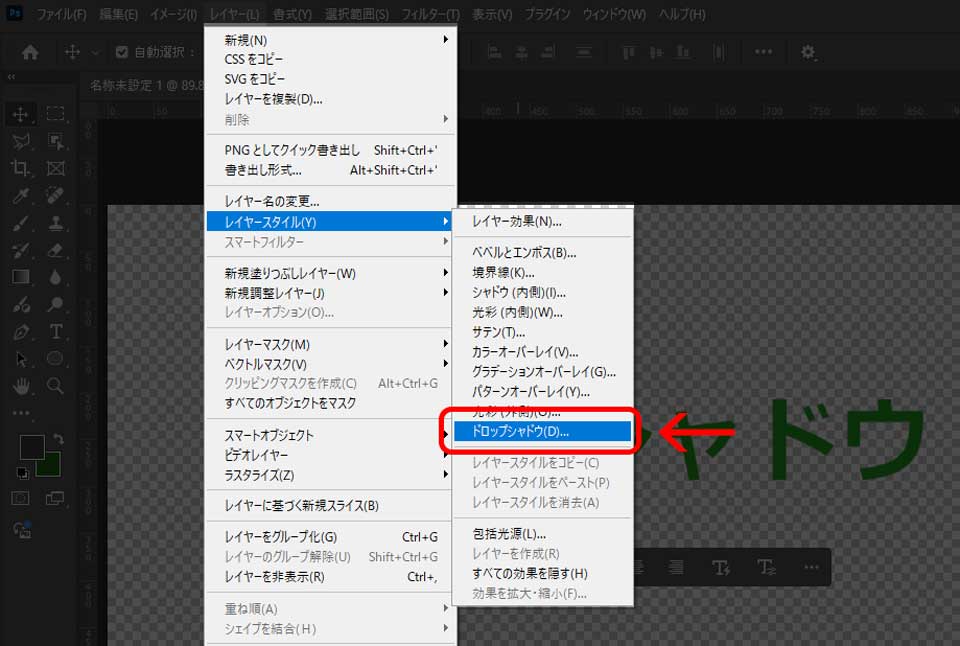
この画面で影の色や角度、不透明度などを細かく調整できます。
自分のデザインに合わせて設定することで、全体の仕上がりが一段と引き立ちます。
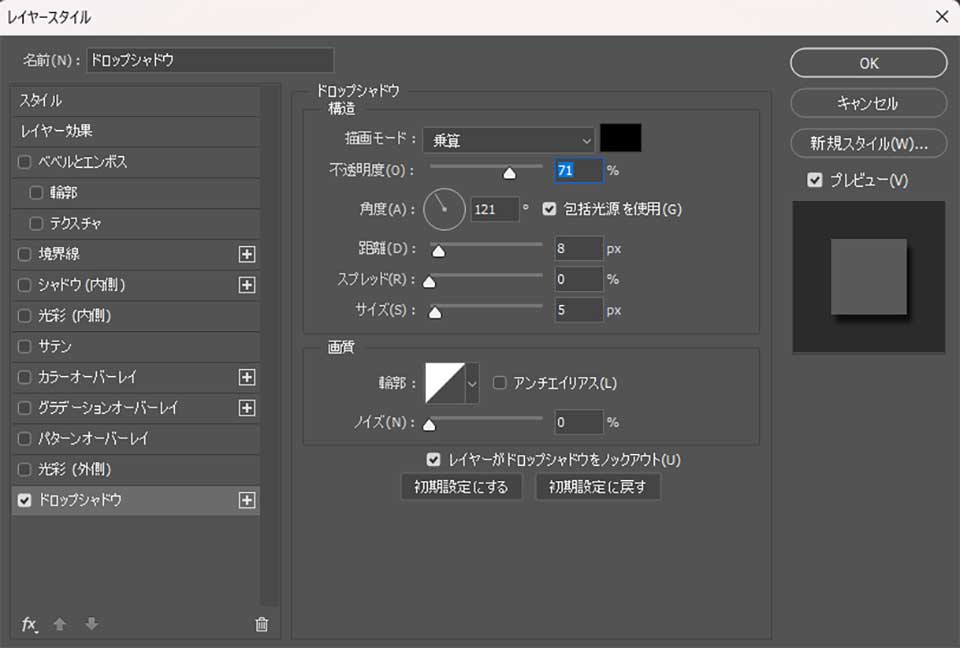
描画モード・色・不透明度の調整方法
ドロップシャドウの効果は、次の3つの項目で大きく変わります。
| 項目 | 内容とポイント |
|---|---|
| 描画モード | 影の「なじみ方」を決める設定。通常は「乗算」が使いやすく、自然に背景となじませることができます。 |
| 色 | 黒が基本ですが、背景色やデザインの雰囲気に合わせて変えるのもおすすめです。 |
| 不透明度 | 影の濃さを調整します。高くするとくっきり、低くするとやわらかい印象になります。 |
これらをうまく組み合わせると、Photoshopならではの自然な影を簡単に作ることができます。
角度・距離・スプレッド・サイズの違いと設定例
さらに細かく調整したいときは、以下の設定を見直しましょう。
| 設定項目 | 説明 |
|---|---|
| 角度 | 光が当たる方向を決める(例:90°で真下に影) |
| 距離 | 影がどれくらい離れるか(遠いほど奥行きが出る) |
| スプレッド | 影の広がり方(0%にすると柔らかく、100%に近づくほどベタ塗りに) |
| サイズ | 影のぼかし具合(大きいとふんわり、少ないとくっきり) |
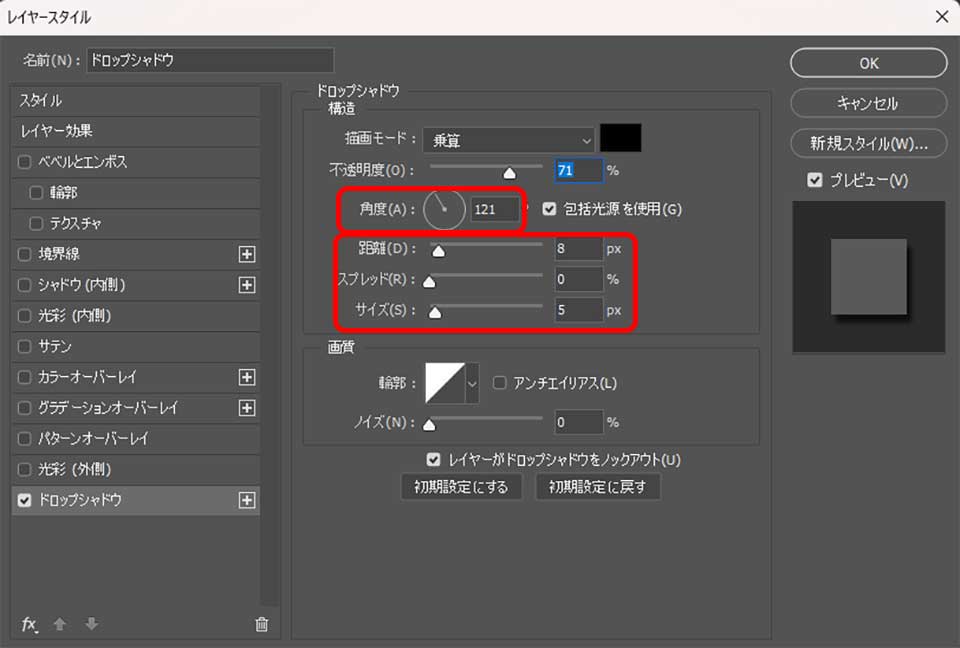
たとえば、シンプルでフラットなデザインには小さめの距離とサイズを。逆に、リアルな立体感を出したい場合は角度や距離を大きめに調整すると自然です。
輪郭やノイズで表現の幅を広げる
さらに影のデザインを工夫したいときは、次のような設定も使えます。
- 輪郭:影の形や縁の見え方をカスタマイズできる
- ノイズ:少しざらっとした質感を加えることで、自然な仕上がりに近づける
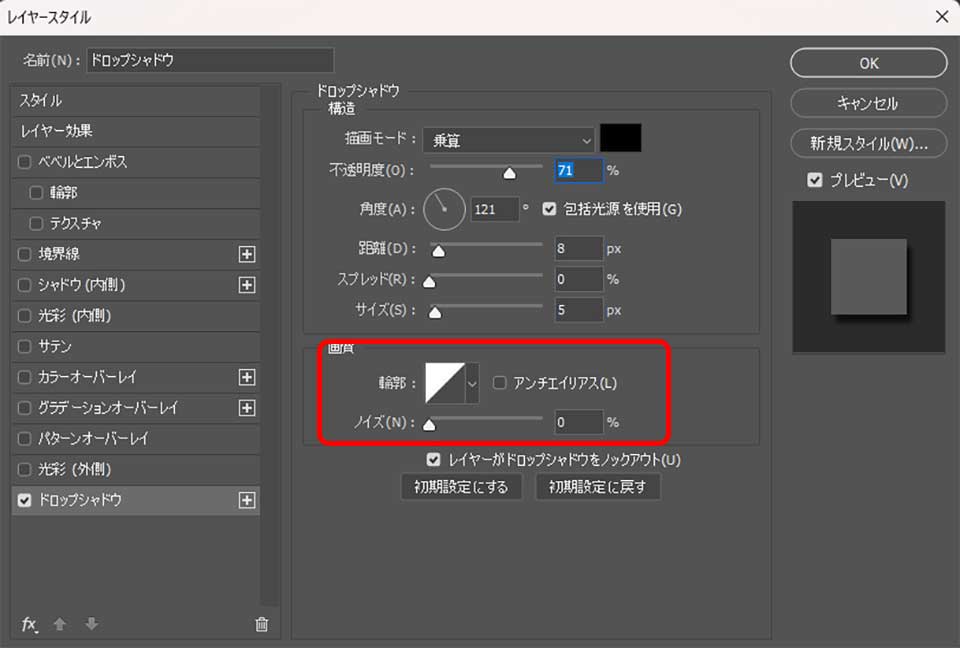
これらを取り入れると、より個性的でリアルな影表現が可能になります。
Photoshopの強みを活かした仕上げ方といえるでしょう。
レイヤースタイルの保存と再利用テクニック
一度設定したドロップシャドウは、簡単に保存して他のレイヤーでも使い回すことができます。やり方は次の通りです。
- 設定済みレイヤーを右クリック
- 「レイヤースタイルをコピー」→別レイヤーに「ペースト」
- または、スタイルパネルに登録しておけばいつでも呼び出し可能
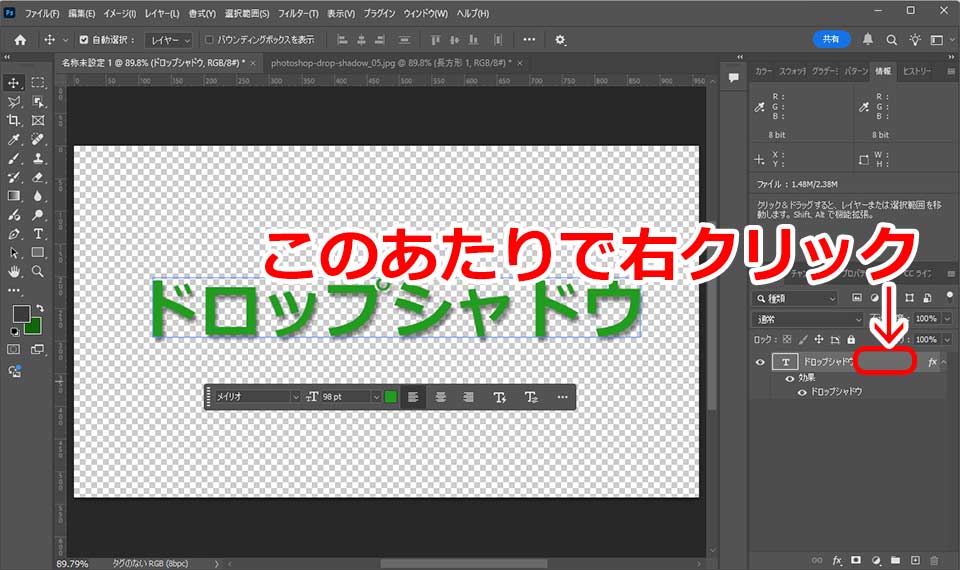
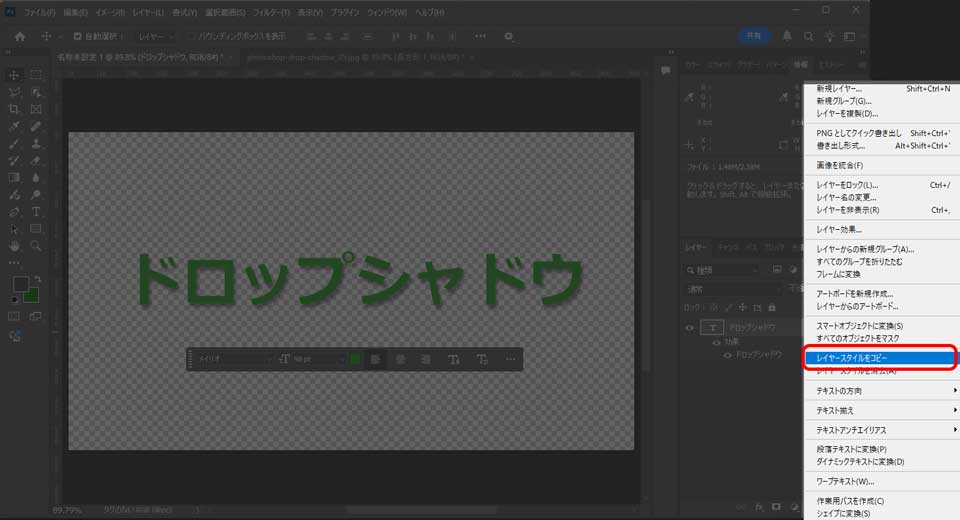
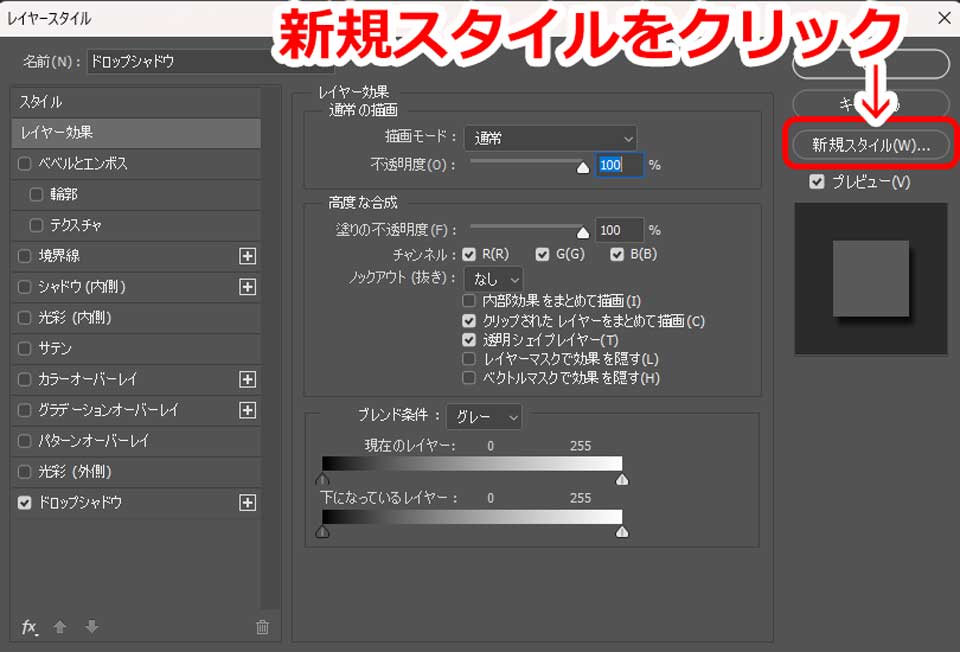
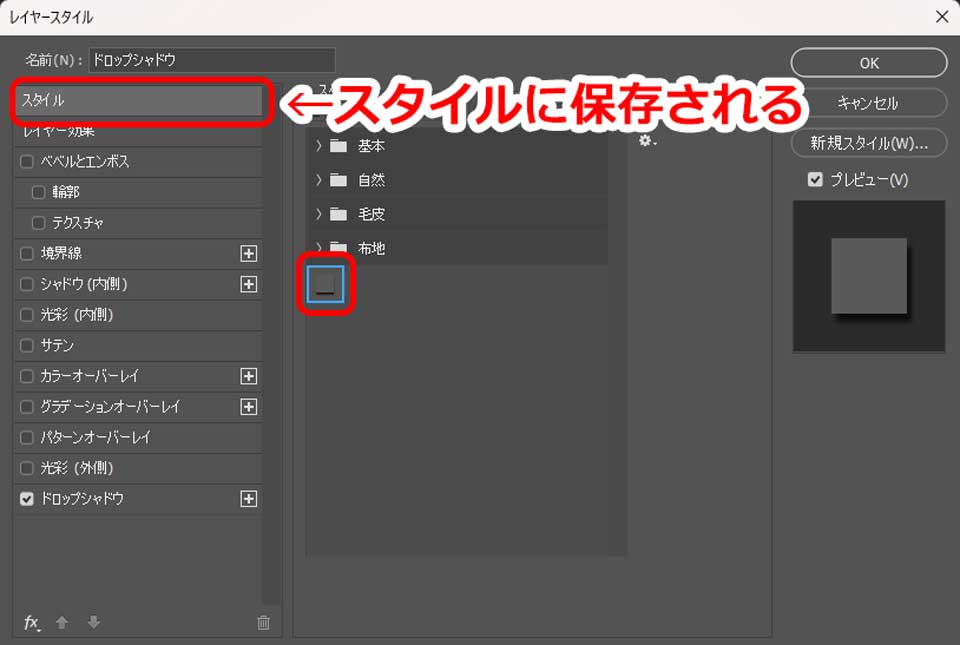
これにより、毎回設定し直す手間を省けるだけでなく、全体のデザインに統一感を出すこともできます。効率的に作業を進めたいときに便利な機能です。
よくあるトラブルとその解決方法(FAQ)
Photoshopでドロップシャドウを使っていると、「影が出ない」「見えにくい」などのトラブルが起きることがあります。ここでは、よくある問題とその解決方法を紹介します。
- ドロップシャドウができない・表示されないとき
-
影がまったく表示されない場合は、以下のような原因が考えられます。
- レイヤーの不透明度が0%になっている
→ レイヤー自体が見えないと、影も表示されません - 描画モードが「通常」や「乗算」など適切でない
→ 描画モードによっては影が表示されにくくなることがあります - 別のレイヤーに隠れている/順番が正しくない
→ 対象のオブジェクトが他のレイヤーに埋もれていないか確認しましょう
これらをチェックしてから、もう一度ドロップシャドウを設定し直すと、正常に表示されることが多いです
- レイヤーの不透明度が0%になっている
- 背景が白くて影が見えないとき
-
白い背景では、影が薄く見えてしまうことがあります。そんなときは、次の調整を試してみてください。
- 影の不透明度を上げて、コントラストを強くする
- 影の色を濃いグレーや別のカラーに変更する
- 背景ではなく、オブジェクトの周囲に影が出るよう調整する
特に文字や図形に影をつける場合は、背景と影のバランスが大事です。見やすさを意識して調整しま
- 影の一部だけを消したいとき
-
「この部分の影だけ消したい」という場面では、マスク機能を使うと便利です。
手順
- シャドウをかけたレイヤーに「レイヤーマスク」を追加
- ブラシツールで消したい部分を黒く塗る
→ その部分の影だけが消えます
これにより、影全体は残しつつ、一部だけを調整できるので、細かいデザインにも対応できます。
- 影の角度や位置がズレているとき
-
影がオブジェクトの方向と合っていないと不自然に見えます。以下の方法で修正しましょう。
- レイヤースタイルの「角度」「距離」を調整
- 光の当たる方向をイメージして、設定を見直す
- オブジェクトの位置を微調整して、影と合わせる
影と本体が自然につながるようにすると、リアルな仕上がりになります。
- ドロップシャドウを消す・一時的に無効にする方法
-
影を消したいときは、レイヤーパネルで簡単に操作できます。
- 影を完全に削除したい場合
→ レイヤースタイルの「ドロップシャドウ」のチェックを外す - 一時的に非表示にしたい場合
→ 目のアイコン(可視状態)をオフにするだけでOK
あとで再度使いたいときに便利な方法です。
- 影を完全に削除したい場合
- Photoshopで作ったドロップシャドウはCSSでどう再現できますか?
-
Photoshopのドロップシャドウと同じような影は、CSSの box-shadow プロパティを使って再現できます。
Photoshopで設定した「距離(距離)」「角度」「ぼかし(サイズ)」「色」などを、以下のようにCSSで置き換えて記述します。
box-shadow: 5px 5px 10px rgba(0, 0, 0, 0.3);- 5px 5px → 横・縦の距離(Photoshopの距離+角度から換算)
- 10px → ぼかしの強さ(サイズに相当)
- rgba(0, 0, 0, 0.3) → 色と不透明度(影の色+不透明度)
Photoshopから数値を読み取って、CSSに変換する際は、角度をX・Y方向に分解して距離を調整する必要があります。
Photoshopドロップシャドウの応用テクニック
基本的な使い方に慣れてきたら、少し高度なテクニックにも挑戦してみましょう。
複数のシャドウを重ねる方法(最大10個)
Photoshopでは、1つのオブジェクトに対して最大10個まで影を重ねて設定することができます。
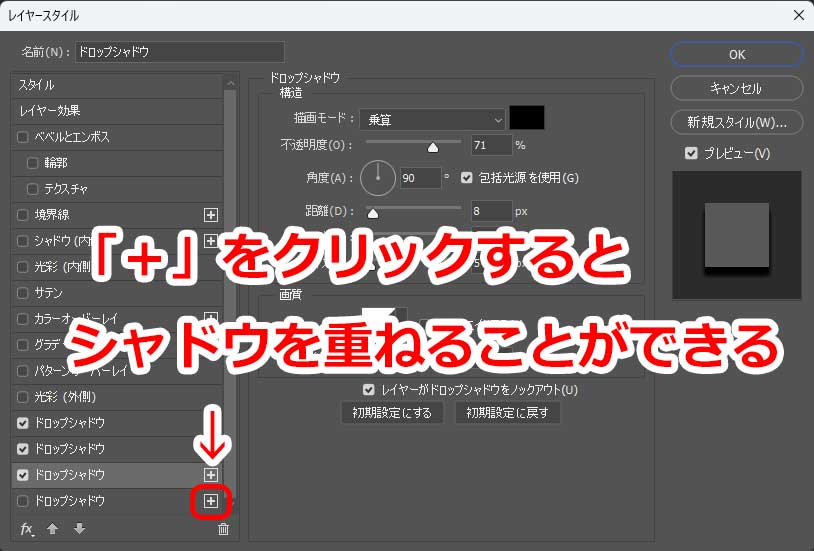
使い方のポイント:
- 各シャドウに異なる角度・距離・不透明度を設定できる
- 色を変えれば、光が複数方向から当たっているような演出も可能
- サイズを変えることで、ぼかしや立体感を自由にコントロールできる
たとえば、青い影+ぼかした黒い影などを組み合わせることで、より個性的で印象的なデザインが仕上がります。
けいすけこの機能を使いこなせば、プロっぽい表現の幅がグッと広がります。
まとめ
Photoshopのドロップシャドウは、設定次第でデザインの印象を大きく変える便利な効果です。影の角度や距離、不透明度などをしっかり調整することで、自然で立体感のある仕上がりを目指せます。
また、トラブルが起きた場合も、今回紹介した対処法を参考にすれば、スムーズに解決できるはずです。さらに慣れてきたら、複数の影を組み合わせるなど、応用的なテクニックにもチャレンジしてみましょう。
デザインの質を上げたいとき、ドロップシャドウの使い方をマスターすることは大きな武器になります。ぜひ本記事を参考に、あなたの制作に活かしてみてください。
\ 7日間無料体験 /
※いつでも解約ができます